Module 11 – Curriculum Plan

CIOS 233 Desktop Publishing: InDesign Alignment Plan

Course Objectives

  1. Set up and design various print and electronic documents such as a business card, postcard, flyer, brochure, and/or other publications, that is appropriate for the intended purpose.
  2. Apply basic design principles to create compelling products for print production and online distribution.
  3. Demonstrate application of the correct selection of tools and features in the Adobe InDesign Interface in the design of documents.
  4. Evaluate the quality of the design of a document to achieve the designer’s intended purpose and its intended publication medium and be able to give constructive feedback for improvement.

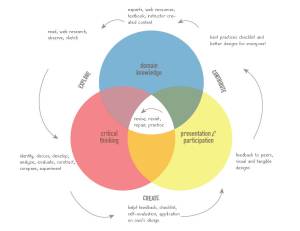
Almost every week, students will be creating some kind of document in Indesign: Business card, postcard, flyer, etc. This assessment gives students the chance to practice using different tools within InDesign and apply basic design principles that they will be learning about. By submitting the InDesign files to me I’ll be able to tell if they selected the correct tool within the program, which you can’t always tell through a .jpg or .pdf file.

I chose this strategy because it is very active. Students have a lot of freedom in the choice of topic and the design elements of their projects, although they do have some constraints based on the new tool or feature we are learning about. Along the way they will be reflecting on good design principles by adding to their own personal checklist. Being able to create and apply new techniques will provide opportunity for demonstration of mastery. The checklist will be a resource that they can use for themselves for self-evaluation as well as to use when evaluating other designs.

Incorporating a collaboration tool like Marqueed or Skwbl to use as a place to evaluate designs and to practice giving and receiving feedback will give students the opportunity to see what other students are producing, what kind of feedback they are giving to others, reflecting on feedback given to themselves by others and applying that feedback to improve their designs.

Compiling their own checklist of best practices throughout the course, revising, editing and reflecting on why specific items have been included can be something that they take with them for use in other classes or in their professional careers. Using that information as a basis for one of the design assignments should be a meaningful exercise. I’m still not sure where to place this in the sequence of assignments. I really like the idea that instead of a disjointed list, that the checklist is succinct.

Other activities in the class will be composed of a few quizzes spread throughout the class to evaluate some facts about copyright, color modes, tools, resolution, file types and some of the other aspects of the course can’t are outlined in the course objectives set by the department. Some of these fact, have to be memorized and you have to be able to identify and explain what they are and how to use them.

For the most past, this is an elective chosen by students who have an interest in creating projects. I’d like students to leave the class having produced a variety of projects using good design sense with a critical idea for improvement.

Module 11: Skwibl


skwiblTool: Skwibl

Link: http://skwibl.com/ (Links to an external site.)

Objective or purpose: upload media, invite collaborators, discuss design

Learning Curve: low

Ease of Use: easy to use

Time required to create: just a few minutes

Key features: create a project and upload images from desktop, dropbox or drive; .png and .jpg.

Problems: limited file type–Doesn’t seem to like PDF or PSD. Drawing and comment bubbles are separate items; available as a Chrome extension; available in Russian just in case it becomes necessary; annotations are in real time; various color and thickness of drawing tools

Barriers: PDF documents would have to be exported as individual images

Educational Uses: upload images and have a conversation around them.

Tutorials: http://skwibl.com/tour (Links to an external site.)

Examples:

Module 11: Designdrop

Tool: DesignDrop

Link: http://www.designdrop.io/ (Links to an external site.)

Objective or purpose: conduct design reviews and collect feedback

Learning Curve: low

Ease of Use: easy to use

Time required to create: very quick

Key features: draw visual annotations, real-time markup, share with short URL; drag and drop images or upload .png, .jpg or .jpeg file types only; annotations are marked with a number and the comment is posted to a sidebar. Overall comments also accepted; client doesn’t have to create an account, they just have to enter a name and email.

Problems: few that I can see – pretty straightforward; no repository for storing projects.

Barriers: individuals would have to add participants to each image that gets uploaded OR share the URL link with the class.

Educational Uses: upload images and have a conversation around them.

Tutorials: none

Examples: http://www.designdrop.io/ (Links to an external site.)

Due to the lack of a storage or repository and group feature, this tool doesn’t seem like a reasonable choice for working with a lot of images/students.

Module 11: Marqueed

Tool: Marqueed

Link: http://www.marqueed.com/ (Links to an external site.)

Objective or purpose: Presentation of images to a group for group commenting

Learning Curve: medium – with more options comes more difficulty. Some thought needs to go into initial set up and organization.

Ease of Use: pencil draw and marque style annotations – each with a comment box. Multiple comments can be made on each annotation. There is also a sidebar chat option.

Time required to create: a few minutes to set up group and then begin adding collections

Key features: Upload (or drag and drop) various image types: .jpg, .png, .gif, .pdf, .psd; public or private collections of images can be uploaded, add annotations; show or hide annotations if you want to review the file on its own; internal (within marqueed) notifications of annotations can be turned on or off. I uploaded a 3-page PDF and each page was added as a separate “image”. This might be a problem if all PDFs have several pages and several people are uploading into the same “collection.”

Problems: don’t quite get the invitation sequence. I thought I sent an invite to a new user but it never showed up. I could add it but it never arrived. You are able to share the link for the collection which got me there. Drawing tool only has one color.

Barriers: Free version only allows for 2 private collections but you can have as many public collections as you wish which might be perfect! As long as you’re able to find the original collection. If you had more than three or four users adding annotations, the screen would quickly fill up and it might be hard to differentiate between comments. Updates made to images are not shown in real time. You have to click away from project in order for new activity to appear.

Educational Uses: upload images and have a conversation around them.

Tutorials: none

Examples: https://www.marqueed.com/public


marqueed

Module 11: Twiddla

Tool: Twiddla

Link: http://www.twiddla.com (Links to an external site.)

Objective or purpose: Interactive whiteboard where you can annotate, chat and even call a phone number to talk over a VOIP.

Learning Curve: low

Ease of Use: If you aren’t afraid to click, once you play with the tools, it seems pretty straight forward

Time required to create: minutes. I uploaded an image and added annotation, used the pencil to draw around an area and used one of the shaped boxes to highlight another area. Added a text comment.

Key features: upload various kinds of document types (webpage, pdfs, image), annotation tools include pencil with various colors, widths, erase, shapes and text input (with various speech bubbles). Also has math formulas (LaTex)

Problems: free account doesn’t allow you to save your drawings and access them more than once. Pro account (lowest level – $14/month) allows for 1 simultaneous meeting, and unlimited storage for multiple projects. Free account is really for clients to be able to see a project and make comments.

Barriers: Free account only allows one-time access and no save feature.

Educational Uses: synchronous or asynchronous meetings around document collaboration.

Tutorials: none

Examples: http://www.twiddla.com/Blog/ (Links to an external site.)

Because this free version of this tools is very limited, I lost interested and didn’t create any examples.

Module 11: Remind

Tool: Remind

Link: https://www.remind.com/ (Links to an external site.)

Objective or purpose: send messages to any device (phone text or email) for free

Learning Curve: low

Ease of Use: set up took 2 minutes; howto documentation automatically created (PDF) with your personal contact information listed. This provides a resource to give to parents or students.

Time required to create: almost immediate; pretty easy to add contacts. Time restriction would be in gathering the data to enter

Key features: can add multiple contact information for students, divorced parents or guardians, grandparents, etc. Once the information is entered, you don’t see phone number and they don’t see your phone number in return.

Problems: people who don’t opt in might feel left out; maintenance of contact list; texting back to teacher’s phone might impact their data plan?

Barriers: must have access to email or text capabilities, pushing information without necessarily acknowledging receipt.

Educational Uses: reminders, student engagement, discipline, fund raising, events, permission slips, documents, photos, homework assignments, field trips, items sales, projects, see 10 ways to use Remind (Links to an external site.)

Tutorials: https://www.youtube.com/user/remindhqvideos/videos (Links to an external site.)

Examples: https://www.remind.com/resources/teachers (Links to an external site.) (Links to an external site.)

YouTube channel: https://www.youtube.com/remindhq (Links to an external site.)

Example of email:

remind-generated-email


Example of Text

reminder-text-message-1

reminder-text-message-2

Module 10 Emerging Tools Reflection

As you review the emerging tools from our list, keep in mind which tools might be most useful for you given your specific circumstances and the student population you serve. As you’re reading and evaluating, remember these points:

  1. Fahy’s article asserts “…media research confirms that what the learner does with media is more important than what the teacher does.”
  2. Recall the information from the Fink text regarding active versus passive learning.
  3. Remember the Community of Inquiry model introduced in the orientation to this course.

How many of the proposed tools are contextualized primarily for teacher presentation (passive learning)? Which have potential for active learning or afford students opportunity to display a product of their learning? Which of the tools have potential for developing or enhancing the community of learners? Which features most actively support learner engagement in a community? Post your preliminary conclusions in this discussion for your weekly writing.


As I look through the tool list, I immediately wanted to brainstorm ideas on how to use the tools for unintended purposes! I’m going to say that almost of the tools have potential uses for both instructors and students. Even the online rubrik creator. Why not have students creating their own rubrics for assignments? Kahoot – students could create their own quizzes based on classroom readings and lectures and share with their classmates.

There are several tools on the list that can not be used in isolation. They are social tools that are meant for a cohort to share. Tools like Remind, Slack, Feedly, Yammer or PBworks. Without that cohort they are ineffective. The power in these tools is that require collaboration from a group, otherwise, they are just reporting tools. These tools are the ones that you would use to engage students.

There are also tools that can be used by both teachers and students to create passive activities. Things like Powtoons, screencasting, mindmapping. If a teacher uses these, I would hope that they would be used in conjunction with some kind of discussion or reflection. You would certainly want to break up the presentation with some thought provoking questions that student might think about while they are watching as supported by some of the research we read earlier in the semester. For students, these tools can be used to provide evidence to the instructor that they have an understanding of the topic and that they can demonstrate that they understand your learning objectives.

Those tools that provide both a passive and active engagement are most interesting to me — those that allow you to create something but also allow for some peer feedback. Storify and Voicethread would be examples that I can immediately identify. Thinking back to our PLE exercise. Those tools are where we can connect, collect, reflect, and share all at the same time–most efficient!

As I look through the list and look at the tools that I added that I feel might have relevance to my own class, I tried to consider what part I will play in the adaptation of the tool. Will I set it up and invite the students to participant in my instance of the tool or will I ask students to create their own webspace and invite the rest of us to join. In the first example, I will be controlling the organization and I will maintain control over all of the images that get added. From an efficiency standpoint that would be the easiest for me when I go to see what everyone is doing throughout the semester. At the end of the semester, I may choose to cancel my account and those artifacts will go away. Or is it a better learning experience for individual students if they maintain their own instance of the tool and invite everyone to join them?

If I have ten students in the class, that means I’ll have to go to ten different sites to check in on everyone. As well, the students will have to manage going to these individual sites as well. In the long run, is having students maintaining their own webspace an important learning outcome? Are students better served by my taking control? These are all consideration I’ll have to make if I decide to adopt one of the tools and all supported by what Fahy talks about when it comes to student’s use of the tools as opposed to the teacher. I’m reminded of Gardner Campbell and Jim Groom’s argument  (Links to an external site.)that every student should have a domain of their own, one that the individual student controls completely to represent who they are as a person and as a student. Am I doing a disservice to the student by making things more convenient for me?

Reflection and Writing – Module 9

The idea of requiring students to present their work via the internet is often met with trepidation by educators. Which concerns are valid? Which are hype? What are the merits of having students present in a public space? In which circumstances do the advantages supersede the concerns? For your writing post this week, weigh the value against the danger of public homework and online student participation.


I’m a big supporter of having students posting their work online in a public forum for several reasons. First, I believe that it helps students understand the legitimacy of what else is being posted online. If they understand that someone else who is just as knowledgeable as they are might be publishing information about a topic of interest.  If they find an “article” on a blog post, it might be an assignment for a similar class that that student might be taking. The information might not be as well researched or accurate as they think and it might not be who they might traditionally think a publisher of information might be. This practice should make them skeptical and be willing to question everything they see online. To go along with this same line of thinking, students who are asked to publish online should be expected to publish their best work and should be more careful to post legitimate and accurate information.

I also do believe that there are occasions when students feel they need to protect their legal name so having an alias is an acceptable practice. Just as long as the teacher knows who you are, it isn’t necessary to publish your name. Allowing for an alias is also a way to make sure you’re in line with FERPA regulations. But I don’t believe having an alias should be a replacement for not being responsible for what you do post or publish online. If you’re publishing anything hurtful or potentially harmful, then you need to take responsible for your actions.

I think the chance of anyone outside of your own cohort actually reading things you post online are pretty slim. And getting someone you don’t know who might make a comment, is even more unlikely. It takes people who want to have a communicative following, years to build and grow that following. And if someone does find you and contradicts what you may have written, that should provide the author with the opportunity to refine and restate and at least be involved in hearing a different opinion. All of these are actions that benefit learning.

Students might cheat. Students will cheat. Some student will always try to find a way to go the easy route. This is why your assessments need to be authentic and challenging so that if a student does find a way to cheat, perhaps they are actually learning along the way. This is also a reason to have multiple assessments so that you and your students are all looking at a variety of performances to show understanding.

I’m also a supporter of using the creative commons licensing for things you create and publish online. If you look at my ONID portfolio, you’ll see I have a license for my site. I have also been double posting my discussion prompts both inside of Canvas and on my site. I’d be thrilled if anyone actually found me!

Revised Curriculum Plan – Module 9


Your primary task this week is to re-evaluate, revise, and publish your unit-sized curriculum plan. Consider the feedback you received from your study partner last week. Reflect on the Information Fluency and Learning Assessment Cycle models discussed in the videos. When you are confident that you have addressed these concepts, share your lesson plan here.


It has been hard to define what a unit-sized curriculum plan is for my course because I don’t have “units” in my class. I’ve organized it by weeks with each week scaffolding on the previous week and building on previous understanding. I’m going to make it difficult on all of you by sharing my curriculum plan for one learning objective that is maintained for the entire course.

One overall course objective is:

Evaluate the quality of a design to verify achievement of the user’s intended purpose and be able to provide constructive feedback for improvement.

Almost every weekly lesson will have a group of similar lesson objectives like the following:

  • Analyze and critique the quality of a design.
  • Develop constructive feedback for improvement.
  • Identify items to support your understanding of good design practices.

Students will provide helpful feedback on design elements that will either be submitting only to me or to the group. Students may submit their feedback in a variety of ways: text, annotation, video or audio, their choice.

Each week additional design concepts will be introduced. Students will add or revise their own personal checklist to incorporate new information and new understanding. Students will use these checklists to help self-evaluate their own work as well as the work that are asked to evaluate. Sometimes that work will be examples the instructor provides, something public or a cohort’s design.

feedback-lac

I’ve applied the Learning Assessment Cycle to this plan as illustrated in the attached graphic. I feel pretty good that my students will be equipped with a three-legged stool, although one leg may be a bit shorter than the other two. The public contribution back into domain knowledge may be a little weak. I haven’t had my students publish in public for the last 3 course offerings because it is too hard to share InDesign files through a blog platform. For some of the assignments looking at the InDesign files is necessary in order to evaluate what is going on behind the scene. I’d like for students to post and public in the public but I also don’t want to include too many kinds of technology. The students already struggle with the InDesign software which is the main technology in the course. And I’m hesitant to have them post and publish to too many places. So their contributions may only be within the privacy of the course itself.

My curriculum plan (google doc)