Screencast deux

ok…learned a big lesson with Screencast-o-matic…I forgot to save my first movie as a screencast and although I did export a .mov copy, I didn’t save the SOM file and therefore I can’t edit it!  bummer….super bummer!

Here are the two other videos that I did successfully save and was able to add an over lay at the end to highlight the steps taken in the demonstration.

iMapFlickr: http://youtu.be/XcfEg4SO3bU

Camera upload to Flickr: http://youtu.be/kEN9eYMOiiw

ScreenCast

I decided to use Screencast-O-Matic for capturing my screencasts. I’ve used this application in the past and feel very comfortable with it. With the free account you can record up to 15 minutes. With the professional account (I think the fee is $15/year) you aren’t time restricted and you can do some simple editing (like cutting out and trimming). Normally, when I create a screencast I have to be efficient with my time. I try not to do too many redos and I’m not concerned with perfection. Otherwise I would never get anything done!

Here are my three screencasts. I created my starter slide in word and saved out to either an html file or a pdf. For two of the casts I used a web browser as the presentation platform and for one of the casts I used a series of images (from the iPhone) saves as a pdf and used Acrobat as the presentation platform.

My strategy:

  • go through the steps, creating accounts, clicking, etc.
  • write out the steps as a script (mostly as a checklist)
  • set up the screencast software and make sure that all the presentation screens show up
  • record and edit if necessary
  • upload to YouTube

The cast using the iphone took a bit more planning since I used screenshot images taken from the phone. I had to do a couple of run-throughs to make sure I had all the images needed to tell the story.

Uploading images from your Desktop to Flickr (http://youtu.be/6YEazmrQu_c)

Uploading images from your IPhone to Flickr (http://youtu.be/8BUBiZHp-pw)

Creating a map from your Flickr Images (http://www.youtube.com/watch?v=O-en2SnFV9c)

ScreenCapture

ScreenCapture is something that I find very helpful. Since I spend my days working with students, faculty, and staff at a distance, creating and sharing a screencapture with some kind of annotation can quickly solve problems or be a solution to share information, often better then through verbal communication.

I work at UAF eLearning with a team of Instructional Designers who are always creating tutorials and handouts for instructors, as well as for instructors to use with their students. We all create documents, some more specific then others. We most often create and share these documents through our google accounts so that it is easy to create a copy if more customization is necessary, without having to go through a similar creation process.

So I used my consumer google account as the basis for this assignment. I have used a variety of capture tools. I really like JING and for most things that is my go-to application. I’ve used Skitch before, but when Evernote bought them out some of the features I used were taken away so I deleted them from my tool box in frustration! I also like Clarify which actually lets you create a series of steps in one document, capture multiple screens and then helps you to lay them out. Clarify costs $30. But I’ve been wanting to try out Monosnap so that is what I used. I really like the features Monosnap offers and its cross-platform, plus it has an iPhone application. One of the really nice features it that it has a blur tool that can be very handy when demonstrating screenshots that might have student-related information on it.

Once again, I’ve used my camera for creating the screenshots. Most of the images are desktop pictures taken from the phone (by holding down the menu button (I call it the home button) and the power button at the top edge of the phone). This puts an image in your camera roll. I collected these images and sent them to myself and used Monosnap on my laptop to annotate the images used in the documents. Perhaps I should have just used the Monosnap app on my phone, but it might have confused me!

So here are my three documents. I’ve shared them with anyone who has the link so you shouldn’t have to log in to google (or create a new account if you don’t have one already) to view them.

What are QR codes?

QR Codes: Downloading Qrafter to your iPhone or iPad

Using Qrafter

Video Assignment

My videos center around a continued theme of walking on the beach. As I mentioned in my post that accompanied by photos, I live on Douglas Island very close to Sandy Beach. During the 1880s through the early 1920s, the Treadwell Mine Complex was the largest mining operation in the country and certainly contained the largest concentrated collection of people in the Alaska.

The three videos I created are centered around the history of the mine and tries to bring to life some of more interesting elements of the Treadwell Mine Historic Trail area that remain today.

Threadwell Mine Historic Trail

http://youtu.be/MWKXtD3hF1I

Treadwell Club

http://youtu.be/SazHXRIgqCY

The Cave-In

http://youtu.be/hLPdPy9siLg

The Process

Equipment

iPhone 5…yep, I just used my iPhone for taking videos and original images. I will admit that the quality of the video probably suffered because of this.

Software

Audacity (for audio recordings) and iMovie 11 (for video recordings)

I’ve used audacity many times before and find it very user-friendly and that it provides good results. I used my on-board laptop microphone. I have a headset but it records a terrible hissing sounds that is fine for online webinars/elive presentations, but it is very distracting for recording audio. I should invest in a better microphone.

I found iMovie 11 frustrating. I guess I haven’t used iMovie since maybe version 9 when it had more useful editing tools and a more informative timeline. It might have been before Adobe bought FinalCut Pro. I think iMovie is really useful for creating a video from still images, and since I did use a lot of historical images, that was nice for me. But I found it tricky to get the audio tracks to line up and I got really frustrated with trying to drag things around. I just couldn’t find the correct “sweet” spot.

Image Resources

Music/Sound Resources

Bibiliography of Historic Resources

Jensen, Wayne. (2010) Treadwell Mining Complex: Historic Resources and Site Survey Report.
Kelly, Sheila. (2010) Treadwell Gold: An Alaska Saga of Riches and Ruin. Fairbanks: University of Alaska Press
Mahaffy, Charlotte, L. (1983). I Remember Treadwell. Coos Bay, Oregon: Accra Print
McCarley, Laura. (1980) Treadwell, Alaska. Juneau: New Treadwell Publications
Stone, David & Stone, Brenda. (1983) Hard Rock Gold: The Story of the Great Mines That were the Heartbeat of Juneau.

Bibliography of Resources for software and moving making process

http://multimedia.journalism.berkeley.edu/tutorials/webvideo/ – semi-useful in some of the general topics but information note written for iMovie 11

http://www.bgsu.edu/downloads/cio/file85783.pdf – very helpful in getting me started in finding what I was looking for

http://help.apple.com/imovie – nice documentation

http://www.storyguide.net/archives/294 – really helpful, especially the image of the screen and what all the buttons do

Unfortunately, I was doing research as I was selecting shots and recording narration so the process probably took longer then if I had done my research before hand. But I was relying on historical photos so that really drove a lot of how the story was told. I knew right away that I wanted to use a reading for one of the videos and thought the segment on the cave-in by the Charlotte Mahaffy was interesting and that I’d be able to find photos to fill out the reading.

These three videos are going to part of an entire website on the Treadwell Mine Complex. On the website will be a map of the location and it will actually be a geo-location oriented website so these videos will be tied directly to a lat-long reading. I’m not yet ready to reveal by big idea…but all the assignments I’m doing for this course will directly tie into it! So I hope you aren’t sick of Alaska history yet! (I promise you won’t be hearing the ragtime music all the other projects!)

Photography Assignment

Hi, my name is Heidi and I’m a snapshot photographer. There I said it. I’m not proud but I’m easily impressed when something I snap actually comes out looking decent. My husband is a photographer so I’ve always relied on him to compose the pretty pictures and often just hand him the camera to document the event. I know sometimes he doesn’t want to be responsible so, this was a good assignment for me. Although I understand the concepts outlined in this assignment, I’ve never really implemented them on a camera or thought deeply about composition or framing when setting up a shot. I learned a lot and look forward to feedback.

When I registered for this class I decided I wanted to do as much as I could with my mobile devices: iPhone 5 or iPad 3 or iPad mini. I wanted to be able to replicate and understand how a student might use these types of devices when preparing their projects and homework assignments. I am hoping that any limitations will be minimal. I found this website very helpful for learning more about the camera app: http://www.griffintechnology.com/blog/tips-and-tricks/stop-taking-crappy-iphone-pictures-part-1/  (along with part 2-6). My ultimate goal was not to have to edit the images –or limit the editing to resolution and size formatting. It can be very time consuming to edit images. I have folders of images that are waiting for editing. and I know that I’ll never get to them. That being said, I did resort to using CS6 Photoshop on my laptop. It is the program I know the best and limited time resulted in going back to that comfort zone.

My images were taken in a 4:3 ratio (standard for iPhone 5) using the default camera application which is really handy since this is the ratio that I was going to use for the three types of files for this assignment. I moved the images to my laptop so that I could view them on my big monitor to check the quality. This was especially important for the images for print. For the images for monitor display I decided to go with a wallpaper size of 1440×900 which is the resolution that my laptop is set. I found conflicting information on “standard” size for creating wallpapers and it seems like the suggestion is to make various sizes so people can pick the best for their use.

Things to remember for next time:

  • take your reading glasses so you can review the images you’ve taken to make sure you don’t need to make an immediate adjustment

For the original photos presented here I reduced the canvas size to a 5×7 or 7×5 for easier viewing on this website.

Here is my collection–A Walk to the Beach
I live on Douglas Island, very close to the small boat harbor and the Treadwell Mine area by Sandy Beach. I walk to the beach almost every day and often take the trail through the old Treadwell Mine area to get to a a second beach area. These images are from a walk I took on a very sunny afternoon.

Prepared for Monitor: Poppy
This beautiful poppy was calling to me as I left the house to walk to the beach.

Original specs: 2448 x 3264 22.9 MB

  poppy-orig

Edit notes:
rotated 90 CCW and changed image size and cropped to 1440 x 900 which brought the file size down to 560 KB

Image

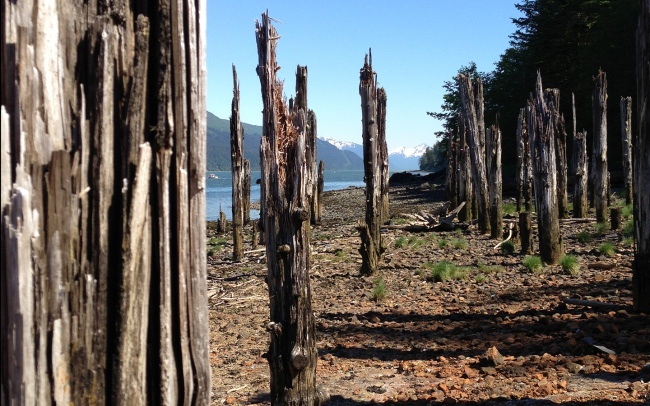
Prepared for Monitor:  Pilings
These are pilings from an old dock at the end of the well maintained gravel trail

Original specs: 2448 x 3264x  22.9 MB

pilings-orig

Edit notes:
cropped and changed image size to 1440 x 900

Image

Prepared for Print: One Mill Wheel
There is lots of equipment, pieces and parts left from when the mine was really active.

Original specs: 2448 x 3264 22.9 MB

One Mill Wheel-orig

Edit notes:
changed resolution to 300 px which changes the size to 8.16 x 10.88 -> reduced to 8 x 10.667 and then cropped to 8 x 10. Final file size is 20.6 MB and the file type is .tiff.
Image

Prepared for Print: Ride the Pipe
Trenches and pipes to transport water for the mining options go for about 13 miles from high in the mountains near Eagle Crest Ski Area to the mine area at sea level.

Original specs: 2448 x 3264 22.9 MB

ride-pipe-orig

Edit notes:
Adjusted the levels so that the green forest wasn’t so dark and is more defined. Adjusting the entire image brought down too much of the contrast on the pipe. Cropped to 4 x 5 proportion and final file size is 21.4 MB and saved as a .tiff

Image

Prepared for Web: Rust King

Original specs: 3264x 2448 22.9 MB

rust-king-orig

Edit notes:
changed image size to 480 x 640; I first adjusted the levels to lighten up the sky and green mountainside as well as the rusty pipe but noticed that in doing this the beach definition became lost. So I did a quick select on the top part of the image as well as the rusty pipe and just lighten the selection. Saved at 60% quality for a final file size of 108 KB.

There were other images that I shot using the camera options to adjust the lightness and darkness that turned out must better as far as contrast and color balance, but I cut off the top of the mountain in those shots.

I would consider formatting this image for print to use as a background image for a poster or flyer  and putting  a layer of text over the beach between the bottom log and the upright log.

Image

Prepared for Web: Seaweed
What beach walk would be complete without an image of seaweed!

Original specs: 2448 x 3264 22.9 MB

seaweed-orig

Edit notes:
cropped to 4 x 3 or 480 x 640 px
Made some individual adjustments to the seaweed, bottom log and to the entire image to help brighten things up. Saved as a web image at quality 60.

Image

and just so you know that I made it to the beach…here is the payoff!

Image